The first time I truly saw the world beneath the waves, it wasn't through a mask, but through a cheap, disposable underwater camera. I was snorkeling in the crystal-clear waters of Koh Lanta, Thailand, mesmerized by schools of iridescent parrotfish darting through coral gardens. I snapped away, convinced I was capturing National Geographic-worthy shots. The anticipation on developing the film was palpable. The result? A blurry, greenish mess of vague shapes and shadows. My heart sank faster than a lead weight.
That moment, however, wasn't a deterrent. It was a catalyst. It ignited a passion not just for exploring the underwater world, but for capturing its breathtaking beauty in a way that truly did it justice. Fast forward years later, and what once felt like an exclusive club for professional divers with astronomical budgets is now incredibly accessible. Technology has leaped forward, making stunning underwater photography a reality for every beginner.
If you’ve ever scrolled through Instagram, drooling over vibrant coral reefs, curious sea turtles, or playful dolphins captured by fellow travelers, and thought, "I could never do that," think again! The trending gear available today is more user-friendly, more affordable, and produces higher quality results than ever before. So, grab your fins, because Tripsora is about to guide you through the exciting world of beginner-friendly underwater photography gear that's making waves right now!
The Gateway Drug: Action Cameras & Waterproof Phone Housings
Let's start with the absolute easiest entry points. You might already own half the equipment! These options are fantastic for snorkelers, freedivers, and casual scuba divers who want to document their adventures without a steep learning curve or massive investment.
1. Action Cameras: The Indestructible Storytellers
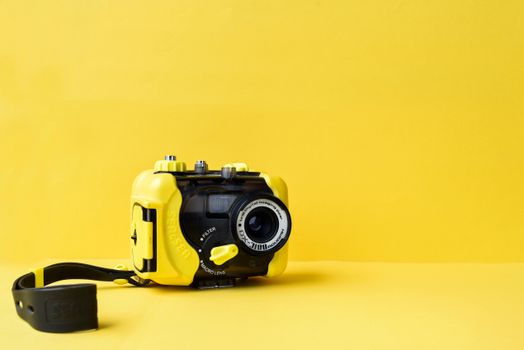
When it comes to action cameras, a few names dominate, and for good reason. They're compact, incredibly durable, and many are waterproof straight out of the box (to a certain depth).
- GoPro Hero 12 Black: The undisputed king. The latest Hero 12 Black (around $399-$449) is waterproof down to 33 feet (10 meters) without any extra housing. For deeper dives (up to 196 feet/60 meters), you'll need the official GoPro Protective Housing (around $49). Its HyperSmooth stabilization makes video incredibly fluid, and improved low-light performance means better results even in deeper, darker conditions. The new 10-bit color capture is a game-changer for post-processing, giving your shots that viral, Instagram-ready pop.
- DJI Osmo Action 4: A formidable challenger (around $299-$399). The Osmo Action 4 boasts impressive waterproofing up to 59 feet (18 meters) without a housing, significantly deeper than the GoPro. Its larger sensor excels in low light, and the magnetic quick-release mounting system is a dream for fast setup and breakdown. The front and rear touchscreens are incredibly handy underwater, too.
My Take: My first 'aha!' moment with underwater photography came with a GoPro Hero 7. I was snorkeling with manta rays in the Maldives, and while the footage wasn't perfect, it was there. I could relive the moment, share it, and it fueled my desire for more. Action cameras are excellent for wide-angle video and stills, especially for capturing fast-moving subjects or expansive reef scenes. They’re super easy to use – just point and shoot!
Pro Tip: Always double-check your camera's seals and ensure the charging port is fully closed before entering the water. For GoPros, invest in a red filter (more on that later) for depths below 10-15 feet to bring back lost colors.
2. Waterproof Phone Housings: Your Phone, Elevated
Yes, you can use your smartphone underwater! Modern smartphones have incredible cameras, and specialized housings turn them into powerful underwater photography tools.
- SeaLife SportDiver Housing: (Around $299-$349) This housing is a game-changer for iPhone and Android users. It connects via Bluetooth to an intuitive app, allowing you to control advanced camera settings like zoom, focus, white balance, and even shoot in RAW. It's waterproof up to 130 feet (40 meters) and even includes a red filter. The best part? You're already familiar with your phone's camera interface.
- AxisGO Water Housing: (Around $199-$299) Designed primarily for iPhones, AxisGO housings are built for surf and shallow water photography (up to 33 feet/10 meters). They're rugged, easy to use, and offer touch-screen access. While not for deep diving, they're perfect for capturing those epic snorkeling or freediving moments.
My Take: I once lent a friend my old iPhone in a SportDiver housing for their first dive trip to Raja Ampat. They came back with stunning photos and videos of pygmy seahorses and vibrant soft corals, all captured on their phone! It proved that you don't need a dedicated camera to start creating incredible content.
Pro Tip: Before diving, enable "airplane mode" on your phone to prevent accidental calls or messages from draining battery or causing issues. Make sure your phone's screen brightness is maxed out for better visibility underwater.
Stepping Up: Compact Cameras with Dedicated Underwater Housings
If you're ready for better image quality, more creative control, and are serious about photography (even as a beginner), compact cameras housed in specialized underwater cases are your next step. These offer larger sensors, better optics, and more manual control than action cameras, but remain relatively compact and user-friendly.
1. The Unsinkable Workhorse: Olympus Tough TG-6
This camera (around $449-$499) is practically synonymous with beginner underwater photography, and for good reason. It's waterproof to 50 feet (15 meters) without a housing, shockproof, crushproof, and freezeproof. But its real magic shines when paired with its dedicated underwater housing (like the Olympus PT-059, around $349-$399, or third-party options like Ikelite, around $500).
- Why it's trending:
- Incredible Macro Capabilities: The TG-6 can focus incredibly close, making it perfect for tiny critters like nudibranchs, pipefish, and coral polyps. Its microscope mode is legendary.
- Underwater Modes: Dedicated underwater white balance and shooting modes (Underwater Snapshot, Underwater Wide, Underwater Macro, Underwater HDR) simplify color correction.
- Expandability: It easily accepts wet lenses (wide-angle or macro) and external strobes/video lights.
My Take: Upgrading to a TG-6 with its housing was a revelation. Suddenly, the vibrant colors I saw with my own eyes in the Red Sea were appearing in my photos, especially when I started using its macro mode. Capturing a tiny anemone crab peeking out was far more satisfying than any blurry wide shot. This camera truly empowers you to explore different types of marine photography.
Pro Tip: Practice using the TG-6's custom white balance feature underwater. It can dramatically improve color accuracy without needing a red filter in some conditions.
2. Premium Compacts: Canon G7X Mark III / Sony RX100 Series
For those seeking even better image quality, especially in low light, without jumping to a full mirrorless setup, premium compacts are the answer. Cameras like the Canon PowerShot G7 X Mark III (around $749) or the Sony RX100 VII (around $1,299) offer larger 1-inch sensors, faster lenses, and more advanced features.
- Why they're trending:
- Superior Image Quality: Larger sensors mean better dynamic range and less noise, especially in challenging underwater conditions.
- Manual Control: Full manual control over aperture, shutter speed, and ISO allows for greater creative expression.
- Video Prowess: Excellent 4K video capabilities make them versatile content creation tools.
My Take: While a bigger investment (housings alone can range from $500-$1,000 for these), the image quality jump is noticeable. I've seen friends capture breathtaking photos of sharks in the Galapagos with a G7X Mark III, showcasing incredible detail and dynamic range that budget cameras simply can't match. They require a bit more learning, but the rewards are immense.
Pro Tip: Start by shooting in Aperture Priority mode to control your depth of field (how much is in focus). This is a great way to ease into manual settings.
Illumination is Key: Strobes & Video Lights for Beginners
Here’s the hard truth: natural light quickly disappears and loses its color spectrum the deeper you go underwater. Everything starts looking blue or green. To bring back those vibrant reds, oranges, and yellows, you need artificial light. This is where strobes and video lights come in, and they're crucial for truly stunning, shareable underwater photos.
1. Strobes: The Flash for the Fish
Strobes are essentially underwater flashes. They provide a burst of light that illuminates your subject, restoring natural colors and adding depth.
- Sea&Sea YS-03 Solis: (Around $399) This is an ideal beginner strobe. It's compact, affordable, and operates in "DS-TTL" mode, meaning it automatically adjusts its power output to match your camera's flash, simplifying exposure. Just point and shoot!
- Ikelite DS51 II: (Around $499) A slightly more powerful option that can be used in both TTL (with Ikelite housings) and manual modes. It's a great choice if you plan to upgrade your camera system later.
My Take: My first dive with a strobe was in the vibrant reefs of Sipadan, Malaysia. Before, my photos of nudibranchs were muted. With the strobe, their intricate patterns and brilliant colors popped like magic! It was the single biggest improvement to my underwater photography.
Pro Tip: Start with one strobe. Position it slightly to the side and above your subject to minimize backscatter (the illuminated particles in the water). As you get more comfortable, you can add a second strobe for more even lighting and creative effects.
2. Video Lights: Constant Illumination for Stills and Motion
While strobes are for still photography, video lights provide continuous illumination. They're essential for video, but also incredibly useful for still photographers as focus lights and for bringing back color in ambient light shots.
- Kraken Hydra 2500/3000: (Around $299-$399) Kraken lights are popular for their excellent build quality, high lumen output, and versatility (they often have red and UV light modes). The Hydra 2500 or 3000 offers plenty of power for beginners.
- Bigblue Dive Lights: (Various models, e.g., Bigblue VL33000P, around $250-$400) Bigblue offers a wide range of reliable video lights known for their consistent beam and long battery life.
My Take: I love using a video light for macro photography. It helps my camera focus in darker areas and adds a beautiful, soft fill light to my subjects without the harshness of a direct flash. Plus, it’s invaluable for quickly switching to video if something exciting happens!
Pro Tip: Choose a light with a wide beam angle (e.g., 100-120 degrees) to ensure even illumination without hot spots.
The Essentials: Red Filters, Trays, and Float Arms
These accessories might seem minor, but they significantly enhance your shooting experience and the quality of your results.
1. Red Filters: Your Underwater Sunglasses
- What they do: Red filters compensate for the loss of red light underwater. They filter out blue and green light, allowing your camera sensor to capture more balanced colors without artificial light, especially in shallower, sunlit conditions (0-50 feet/0-15 meters).
- Trending options: Many action camera housings and compact camera housings have specific red filters designed to snap on. Backscatter's FLIP filters are particularly popular for GoPros, offering multiple filters for different depths. (Around $20-$150 depending on the system).
My Take: Before I understood red filters, all my photos below 10 feet were an uninspiring blue. Adding a simple red filter to my GoPro instantly made the coral vibrant and the fish colorful again. It’s an absolute must-have for any action camera user.
Pro Tip: Remove your red filter if you're shooting with a strobe or video light, or if you're in very shallow water (less than 10 feet). Red filters aren't magical; they work best with natural light.
2. Trays & Arms: Stability and Mountability
- What they do: A tray provides a stable platform for your camera housing, offering handles for better grip and reducing camera shake. Arms extend from the tray to mount your strobes or video lights, allowing for flexible positioning.
- Trending options: Single or dual-handle trays are available for most camera housings. Look for brands like Ultralight Control Systems, Fantasea, or Ikelite. (Around $100-$300 for a basic tray and arm setup).
My Take: Trying to hold a camera housing and a strobe in two separate hands while maintaining buoyancy is a recipe for disaster. A good tray and arm system makes your setup feel like one cohesive unit, giving you much more control and stability. My shots improved dramatically once I invested in a simple dual-handle tray.
Pro Tip: Start with a single-handle tray if you only have one light. If you plan to add a second light, a dual-handle tray is more ergonomic and offers better balance.
3. Float Arms: The Buoyancy Boosters
- What they do: As you add more gear (housing, camera, strobes, lights), your setup can become negatively buoyant (it sinks). Float arms are hollow or foam-filled arms that add positive buoyancy, making your entire system neutrally or slightly positively buoyant. This reduces arm fatigue and makes it easier to handle your camera underwater.
- Trending options: Brands like Nauticam, Ultralight Control Systems, and Inon offer various sizes and types of float arms. (Around $50-$200 per arm).
My Take: My shoulders used to ache after a long dive with a heavy camera rig. Adding a few float arms was a revelation! It made maneuvering the camera so much easier, allowing me to focus on composition rather than fighting negative buoyancy.
Pro Tip: Experiment with different float arm configurations to find the perfect balance for your specific setup. You want it to be slightly negative or neutral so it doesn't float away, but light enough to easily move.
Beyond the Gear: Essential Beginner Photography Tips
Having the best gear is only half the battle. Here are some actionable tips to help you capture those viral, Instagram-worthy shots:
- Practice, Practice, Practice: Don't wait for your dream dive trip. Start in a pool, then in shallow, clear water. Get comfortable with your camera's settings, housing controls, and buoyancy.
- Get Close (Really Close!): Water absorbs light and clarity. The less water between your lens and your subject, the better. This is the golden rule of underwater photography. Don't be afraid to get within inches of your subject (without touching, of course!).
- Shoot Upwards: Whenever possible, try to shoot your subjects with the sun or surface as the background. This creates beautiful silhouettes and avoids distracting backgrounds. It also helps with lighting.
- Master Buoyancy Control: This is paramount. Good buoyancy protects the reef, keeps you safe, and allows you to hover steadily for sharp shots. Take a specialty buoyancy course if needed.
- Respect Marine Life: Never touch, chase, or harass marine animals. Observe from a respectful distance. A calm, patient approach often yields the best, most natural shots.
- Learn Basic Post-Processing: Even with perfect gear, a little post-processing goes a long way. Learn to adjust white balance, contrast, and color saturation. Free tools like Snapseed on your phone or GIMP on your computer are great starting points.
- Take a Course: Consider a dedicated underwater photography course (like a PADI Digital Underwater Photographer specialty). It’s invaluable for learning composition, lighting, and camera settings specific to the underwater environment.
Trending Tech & What's Next
The world of underwater photography is constantly evolving. What's trending now and what's on the horizon?
- AI-Powered Color Correction: Many new camera apps and even some camera firmware are integrating AI to automatically correct underwater color shifts, making post-processing even easier for beginners.
- Improved Battery Life & Connectivity: Longer-lasting batteries and seamless wireless connectivity (via Bluetooth or Wi-Fi) are making it easier to shoot multiple dives and transfer photos quickly.
- More Compact & Modular Systems: Manufacturers are focusing on creating smaller, lighter, and more modular systems that can be easily customized and expanded as your skills grow, without needing to replace your entire setup.
The future of underwater photography for beginners looks bright, colorful, and incredibly accessible!
Your Underwater Journey Starts Now!
The ocean is a treasure trove of wonder, and with the right gear and a little practice, you can bring its magic to the surface. Gone are the days of blurry, green disappointments. Today's trending beginner-friendly gear makes it possible for anyone to capture stunning, shareable moments that will make your friends green with envy (in a good way!).
So, what are you waiting for? That vibrant coral reef, that curious sea turtle, or that majestic manta ray is waiting for its close-up. Equip yourself, dive in, and start telling the incredible stories of the underwater world.
What's your dream underwater shot? Share your favorite gear or tips in the comments below! Ready to dive in? Check out our links for trending gear deals and start planning your next aquatic adventure!