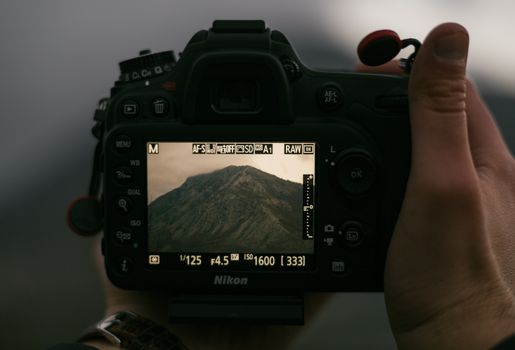
Hey fellow adventurers and memory-makers!
Let me tell you a story. It was my very first big solo trip, a backpacking odyssey through Southeast Asia. I was armed with a brand-new, fancy-ish DSLR, convinced that simply owning it would magically transform me into a National Geographic photographer. Fast forward three months, and I'm back home, excitedly flipping through my digital albums… only to be met with a sea of blurry sunsets, washed-out temples, and selfies where I looked like I’d been photographed through a potato. The majestic Angkor Wat? A grainy, underexposed blob. The vibrant street food markets of Bangkok? A chaotic blur of color, not quite in focus. My heart sank. I had experienced some of the most incredible moments of my life, but my photos barely scratched the surface of that magic.
Sound familiar? You’ve stood on the precipice of an ancient ruin, gazed at a sunset painting the sky in fiery hues, or witnessed a fleeting cultural moment – only to have your camera fail to capture the intensity, the color, the feeling of it all. It’s soul-crushing, isn't it? Especially when you know these are moments you might never get back.
That's when I realized: it wasn't the camera's fault, nor was it mine for not having an "artistic eye." It was my ignorance of the tools at my fingertips. I was letting my expensive gear sit on "Auto" mode, hoping for the best, when it was capable of so much more. And that, my friends, is a travel photography sin we're going to rectify today.
Consider this your definitive, no-nonsense guide to the camera settings that will transform your travel photos from "meh" to "MAGNIFICENT." We're talking about capturing those jaw-dropping, share-worthy, "I can't believe I took that" shots that truly reflect your adventures. Forget complicated jargon; we’re breaking down the essentials you need to master before you die and miss another perfect shot. Ready to unleash your inner photography guru? Let's dive in!
1. The Holy Trinity: Aperture, Shutter Speed, & ISO – Your Creative Core
Think of these three settings as the fundamental building blocks of every photograph. They work together, influencing the brightness and look of your image. Understanding their relationship is like learning the secret handshake of photography.
a. Aperture (f-stop): The Depth Maestro
- What it is: The size of the lens opening that lets light into your camera. Measured in f-numbers (e.g., f/1.8, f/5.6, f/22).
- What it does: Controls depth of field (how much of your image is in focus) and affects brightness.
- Small f-number (e.g., f/1.8, f/2.8): Wider opening, shallow depth of field. This means your subject is sharp, but the background is beautifully blurred (that creamy "bokeh" effect everyone loves!). Perfect for portraits, food photography, or isolating a specific detail in a busy scene.
- Large f-number (e.g., f/11, f/22): Narrower opening, deep depth of field. Everything from the foreground to the background will be sharp. Essential for landscapes, architecture, and group shots where you want everything in focus.
- My Story: I once tried to photograph a gorgeous plate of Pad Thai in Chiang Mai with a high f-number (f/16), wanting everything sharp. The result? The bustling market behind it was also sharp, distracting from the delicious noodles! Switching to a low f-number (f/2.8) made the Pad Thai pop, blurring the background into a beautiful, colorful wash. Instant food blogger material!
- Actionable Tip: For portraits or details, start with f/2.8-f/5.6. For sweeping landscapes, aim for f/8-f/16.
b. Shutter Speed: The Time Bender
- What it is: How long your camera's shutter remains open, allowing light to hit the sensor. Measured in fractions of a second (e.g., 1/2000s, 1/60s) or full seconds (e.g., 2s, 30s).
- What it does: Controls motion in your photo and affects brightness.
- Fast Shutter Speed (e.g., 1/1000s, 1/2000s): Freezes action. Ideal for capturing fast-moving subjects like a hummingbird at a Costa Rican flower, a street performer mid-jump in Barcelona, or surfers catching a wave in Bali.
- Slow Shutter Speed (e.g., 1/30s, 1s, 30s): Blurs motion. Creates dreamy effects like silky smooth waterfalls, light trails from cars at night, or ghostly figures in a bustling city square. Requires a tripod to prevent camera shake.
- My Story: My first attempt at capturing the iconic Seljalandsfoss waterfall in Iceland resulted in a messy, blurry white streak. I was shooting at 1/250s. After learning about shutter speed, I returned with a tripod, dropped my shutter speed to 2 seconds, and voila! – the water transformed into a mystical, ethereal flow. It was an absolute game-changer.
- Actionable Tip: For handheld shots, aim for at least 1/60s (or faster if your lens has image stabilization). For freezing action, go 1/500s or faster. For motion blur, experiment with 1/15s down to several seconds (use a tripod!).
c. ISO: The Light Amplifier (Use with Caution!)
- What it is: Your camera sensor's sensitivity to light. Measured in numbers like 100, 200, 800, 6400.
- What it does: Brightens your image in low light, but at a cost.
- Low ISO (e.g., 100, 200): Least sensitive to light, produces the cleanest, most detailed images with minimal "noise" (graininess). Always use the lowest possible ISO for optimal quality, especially in bright conditions.
- High ISO (e.g., 1600, 6400): More sensitive to light, brightens dark scenes. However, it introduces digital noise, making your photos look grainy or pixelated.
- My Story: Exploring dimly lit temples in Kyoto, I cranked my ISO up to 6400 because I didn't want to use a flash. While the photos were bright, they looked like they'd been taken on a cheap phone from 2005. The intricate details of the carvings were lost in a sea of digital noise. I learned my lesson: only increase ISO as a last resort, after adjusting aperture and shutter speed.
- Actionable Tip: Always start with ISO 100 or 200 in good light. Only increase it when necessary to get a proper exposure, balancing brightness with acceptable noise levels. Modern cameras handle higher ISOs better, but the principle remains.
2. Mastering Light: White Balance & Exposure Compensation
Beyond the Holy Trinity, these two settings are crucial for ensuring your photos look natural and are perfectly exposed.
a. White Balance (WB): True Colors, Every Time
- What it is: Your camera's way of interpreting colors based on the light source. Different light (sunlight, fluorescent, cloudy) has different color temperatures, making whites appear blue, yellow, or green.
- What it does: Corrects color casts, ensuring white objects appear truly white, and other colors are rendered accurately.
- Auto White Balance (AWB): Often does a decent job, but can be fooled by mixed lighting or dominant colors.
- Presets: Your camera has presets like "Daylight," "Cloudy," "Shade," "Tungsten" (for indoor incandescent lights), "Fluorescent," and "Flash." These are great starting points.
- Custom White Balance: The most accurate method. You take a photo of a white or gray card in the scene, and the camera calibrates itself.
- My Story: I remember a stunning sunrise over the caldera in Santorini. The sky was painting itself in incredible oranges and pinks, but my camera, left on AWB, kept trying to "correct" it, making the entire scene look dull and bluish. Switching to "Cloudy" or even "Shade" (which adds warmth) instantly brought out the vibrant, fiery colors I was seeing. It felt like magic!
- Actionable Tip: While AWB is convenient, experiment with presets. For warm sunsets, try "Cloudy" or "Shade" to enhance the warmth. For overly cool indoor shots, try "Tungsten." If you shoot RAW (which you should!), you can fine-tune WB in post-processing.
b. Exposure Compensation (EV): Fine-Tuning Brightness
- What it is: A setting that allows you to intentionally make your photo brighter or darker, even when shooting in semi-automatic modes (like Aperture or Shutter Priority). It's usually represented by a "+/-" button or dial.
- What it does: Adjusts the overall brightness of your image.
- Positive EV (+0.3 to +2.0): Brightens the image. Useful for snowy scenes (cameras often underexpose snow, making it look gray) or when your subject is backlit.
- Negative EV (-0.3 to -2.0): Darkens the image. Useful for very bright scenes, or when your subject is much darker than the background (e.g., a dark statue against a bright sky).
- My Story: Photographing the shimmering salt flats of Salar de Uyuni in Bolivia, my camera consistently underexposed the vast white landscape, making it look dull. A quick adjustment to +1.0 EV made the salt sparkle and the sky pop, just as it did in real life. It’s a subtle but powerful tool to get the exposure just right.
- Actionable Tip: Use EV when your camera's meter is getting confused. If your photo looks too dark, increase EV. If it's too bright, decrease it. Always check your histogram (a graph showing brightness distribution) if your camera has one, to ensure you're not clipping highlights or shadows.
3. Focus Like a Pro: Autofocus Modes & Points
A sharp photo is a good photo. A blurry photo, no matter how great the composition, is a throwaway. Understanding how your camera focuses is paramount.
a. Autofocus Modes: Still or Moving?
- Single-Shot AF (AF-S on Nikon/Sony, One-Shot AF on Canon): Best for still subjects. The camera locks focus when you half-press the shutter button, and it stays locked as long as you hold it. Perfect for landscapes, portraits, or stationary objects.
- Continuous AF (AF-C on Nikon/Sony, AI Servo AF on Canon): Best for moving subjects. The camera continuously adjusts focus as long as you half-press the shutter button, tracking your subject. Essential for wildlife, sports, or capturing a bustling street scene with people walking.
- Manual Focus (MF): You control the focus ring on your lens. Useful in very low light where autofocus struggles, for macro photography, or when you want precise control (e.g., focusing on a specific eye in a portrait).
- My Story: In the labyrinthine souks of Marrakech, I was trying to capture a fleeting moment of a spice vendor laughing, but my photos kept coming out blurry. I was on AF-S. Switching to AF-C allowed my camera to track his slight movements as he spoke, resulting in a perfectly sharp, candid moment that truly captured the vibrant energy of the market.
- Actionable Tip: Assess your subject. If it's not moving, use AF-S. If it's moving, use AF-C. Don't be afraid of MF for creative control in specific situations.
b. Autofocus Points: Pinpoint Precision
- What it is: The little squares or dots you see in your viewfinder or on your LCD screen. These are the areas your camera uses to detect focus.
- What it does: Allows you to tell your camera exactly where to focus.
- Single-Point AF: You select one specific point to focus on. Ideal for precise focus, like on a subject's eye in a portrait.
- Dynamic Area AF / Zone AF: You select a group of points, and the camera uses them to track a moving subject within that zone.
- Auto-Area AF / Wide Area AF: The camera automatically chooses the focus point(s). Convenient but can sometimes focus on the wrong thing.
- Actionable Tip: For maximum control, especially with portraits or specific details, use Single-Point AF and move the focus point directly onto your desired subject. Avoid letting the camera guess with auto-area focus unless you're in a very simple scene.
4. Beyond Auto: Shooting Modes for Every Scenario
While "Auto" mode might seem easy, it's like driving a Ferrari in first gear. Your camera has so much more potential! Stepping into semi-automatic and manual modes unlocks true creative freedom.
a. Program Mode (P): The Smart Helper
- What it is: The camera sets both aperture and shutter speed, but you can still control ISO, White Balance, and Exposure Compensation. Some cameras allow "program shift" to slightly adjust the aperture/shutter speed combo.
- When to use it: When you need to react quickly and don't have time to fully dial in manual settings, but still want more control than "Auto."
b. Aperture Priority (Av or A): Master of Depth
- What it is: You set the aperture (f-number), and the camera automatically selects the appropriate shutter speed for correct exposure.
- When to use it: My go-to for most travel photography! Perfect when depth of field is your priority – portraits (low f-number for bokeh), landscapes (high f-number for sharpness), or food shots. This is where you gain significant creative control.
c. Shutter Priority (Tv or S): Master of Motion
- What it is: You set the shutter speed, and the camera automatically selects the appropriate aperture for correct exposure.
- When to use it: When controlling motion is your priority – freezing action (fast shutter speed for street performers, wildlife) or creating motion blur (slow shutter speed for waterfalls, light trails).
d. Manual Mode (M): Total Creative Control
- What it is: You set everything – aperture, shutter speed, and ISO.
- When to use it: For challenging lighting conditions, artistic long exposures, studio work, or when you have time to meticulously craft your shot. It's the ultimate learning tool, forcing you to understand the relationship between the Holy Trinity.
- My Story: For years, I was intimidated by Manual mode. But on a photography workshop in the Dolomites, my instructor challenged me to shoot an entire day in M. It was frustrating at first, but by constantly adjusting and reviewing, something clicked. I finally understood the dance between aperture, shutter speed, and ISO. Now, for those truly epic shots – like capturing the Milky Way over the Atacama Desert – Manual mode is my trusted companion, allowing me to push my camera to its limits. Don't fear it; embrace it!
5. Composition is King: Settings for Impact
No matter how perfect your exposure, a poorly composed photo falls flat. While composition is an art, some camera settings and features help you nail it.
a. Grid Lines (Rule of Thirds): Your Visual Guide
- What it is: Most cameras allow you to overlay grid lines in your viewfinder or on your LCD screen. The "Rule of Thirds" grid divides your image into nine equal sections.
- What it does: Helps you place your subject off-center, creating more dynamic and visually interesting compositions. Place key elements along the lines or at their intersections.
- My Story: I used to plonk every single subject dead center. My photo of the Eiffel Tower was... just the Eiffel Tower. When I started using the grid lines, placing the tower slightly to the left or right, with a beautiful Parisian street leading up to it, the photos gained depth and narrative. It's such a simple setting, but incredibly powerful.
- Actionable Tip: Turn on your grid lines! It's a fantastic visual aid for applying the Rule of Thirds, leading lines, and balancing elements in your frame.
b. Drive Mode (Burst/Continuous Shooting): Never Miss a Moment
- What it is: Allows your camera to take multiple photos in rapid succession as long as you hold down the shutter button.
- What it does: Increases your chances of capturing that perfect, fleeting moment, especially with moving subjects.
- When to use it: Street photography, wildlife, children playing, capturing a splash, a bird taking flight.
- Actionable Tip: Don't just take one shot. When you see a great moment unfolding, engage burst mode. You can always delete the extra frames later, but you can't recreate a missed moment.
c. Image Quality (RAW vs. JPEG): The Post-Processing Powerhouse
- What it is: How your camera saves the image data.
- JPEG: A compressed file format. The camera processes the image, applies sharpening, color, and contrast, and discards a lot of data. Smaller file size, ready to share.
- RAW: An uncompressed, unprocessed file. It's like a digital negative, containing all the data the sensor captured. Larger file size.
- What it does: Shooting RAW gives you maximum flexibility in post-processing. You can adjust exposure, white balance, colors, and shadows much more effectively without introducing quality loss.
- My Story: For years, I shot only JPEG, thinking it was easier. Then, I tried to recover details in a slightly underexposed sunset photo from the Grand Canyon. In JPEG, it was impossible without making the photo look terrible. When I tried with a RAW file, the details in the shadows magically reappeared, and the colors became vibrant. It was a revelation!
- Actionable Tip: If you're serious about getting the best out of your travel photos, always shoot in RAW (or RAW+JPEG for convenience). Invest a little time in learning basic editing software like Adobe Lightroom or free alternatives. It's where good photos become great.
6. Essential Gear & Settings for Specific Scenarios
While this post is about settings, a few key gear pieces complement them perfectly.
a. Tripod: Your Stable Companion
- Settings Impact: Absolutely essential for long exposure photography (silky waterfalls, starry night skies, light trails) where your shutter speed is too slow to hand-hold. Allows you to use low ISO for maximum image quality.
- My Story: I used to think tripods were for "serious" photographers. But when I finally invested in a lightweight travel tripod (around $100-$150), my night photography game exploded. Capturing the Northern Lights over a remote cabin in Norway, with my camera on a tripod, a 20-second exposure, and low ISO – that's a memory, and a photo, I'll cherish forever.
- Actionable Tip: Don't skimp on a travel tripod if you plan on any low-light or long-exposure shots. It will open up a whole new world of creative possibilities.
b. Lens Choice: It Changes Everything
- Settings Impact: Different lenses have different maximum apertures (e.g., f/1.4 vs. f/4). A "fast" lens (low f-number) allows you to shoot in lower light with lower ISO, and achieve more background blur.
- My Story: My kit lens (f/3.5-5.6) was okay, but when I bought a cheap 50mm f/1.8 prime lens (often under $200), my portrait and low-light photos transformed. I could shoot in dimmer cafes in Paris without cranking up my ISO, and the bokeh was dreamy.
- Actionable Tip: Understand your lens's capabilities. If you want more background blur or better low-light performance, consider a prime lens (like a 35mm or 50mm f/1.8) – they're often affordable and a fantastic upgrade.
7. Practice, Review, & Embrace the Journey
The biggest secret to perfect travel photos isn't a magic setting; it's practice.
- Experiment: Don't be afraid to try different settings. The beauty of digital photography is that you can delete bad shots.
- Review: Look at your photos on your camera screen, and later on a larger monitor. What worked? What didn't? Why? This critical self-analysis is how you learn.
- Learn from Others: Follow travel photographers whose work you admire. Analyze their photos – what's in focus? Is the background blurred? How bright is it?
- Embrace the Imperfection: Not every shot will be perfect, and that's okay. Some of the best travel memories are captured in candid, slightly imperfect moments.
Conclusion: Your Memories Deserve the Best
You travel to experience, to explore, to collect memories that will last a lifetime. Your photographs are the tangible echoes of those adventures, the stories you'll share, the moments you'll revisit. Don't let your camera's "Auto" mode dictate how those precious memories are preserved.
By understanding and consciously applying these camera settings – the Holy Trinity of Aperture, Shutter Speed, and ISO, along with White Balance, Exposure Compensation, and intelligent Autofocus – you're not just taking pictures; you're crafting visual masterpieces. You're giving your once-in-a-lifetime experiences the visual legacy they deserve.
So, the next time you're standing before a breathtaking landscape, capturing a vibrant street scene, or simply enjoying a delicious meal on your travels, take a moment. Think about the light, the motion, the depth you want to convey. Dial in those settings. And then, click. You'll be amazed at the difference.
Go forth, fellow travelers, and capture the world in all its glorious detail. Your perfect travel photos await!
Now it's your turn! What's one camera setting you're excited to try on your next trip? Share your tips and triumphs in the comments below! And when you capture those incredible shots, be sure to tag @Tripsora and use #TripsoraPerfectPic so we can celebrate your photographic journey with you!
---